Nivel de agua con alarmas LED y zumbador con distancia de nivel y temperatura en LCD.
COMPONENTES Y SUMINISTROS
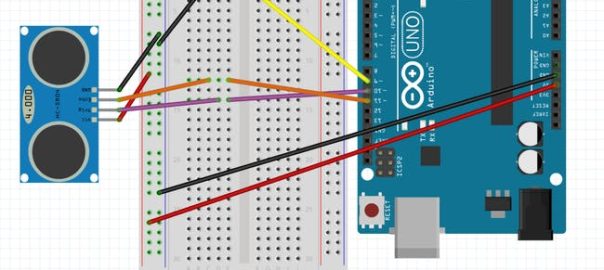
- Arduino UNO
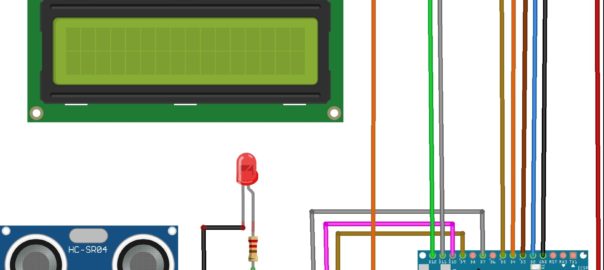
- LCD 16×2
- Sensor ultrasónico – HC-SR04
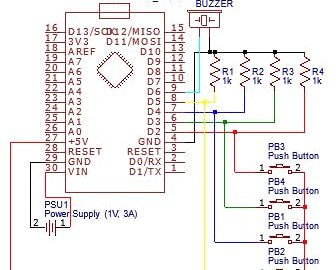
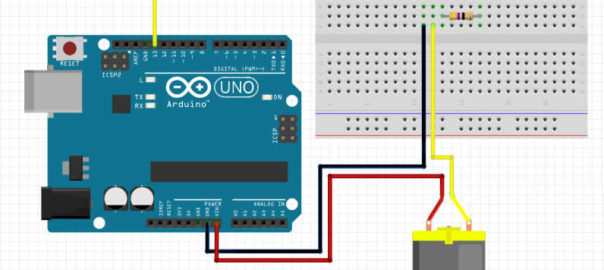
- Integrado DS18B20
- Resistencia de 4,75 k ohmios
- Interruptor pulsador 12mm
- Potenciómetro de una sola vuelta – 10k ohmios
- Zumbador
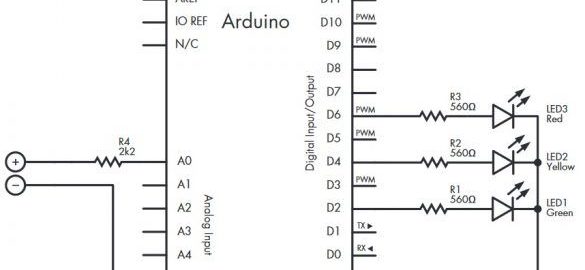
- LED verde, 1 amarillo y 1 rojo.
- Resistencia 221 ohmios
- Protoboard 400p
- Cables de puente
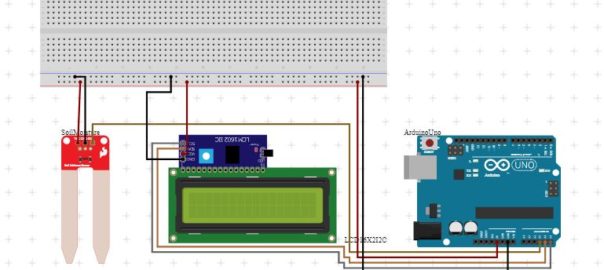
Este proyecto me brinda la información que necesito sobre el nivel del agua en un tanque de agua. Cuando el nivel es bajo, el LED verde está encendido. Cuando el nivel es medio, el LED amarillo está encendido. Cuando el nivel es ALTO, el LED rojo parpadea al mismo tiempo con un zumbador. La distancia desde el sensor hasta el nivel del agua se mide mediante el sensor ultrasónico y se imprime en la pantalla LCD junto con la temperatura en ese tanque. Este proyecto es parte de un proyecto más grande. La segunda parte constará de 6 LEDS de seguimiento montados en un círculo para indicar que la bomba está bombeando.
#include <LiquidCrystal.h>//Load Liquid Crystal Library
#include <OneWire.h>
#include <DallasTemperature.h>
#define ONE_WIRE_BUS 6 // Data wire is plugged into pin 6 on the Arduino
OneWire oneWire(ONE_WIRE_BUS); // Setup a oneWire instance to communicate with any OneWire devices
// (not just Maxim/Dallas temperature ICs)
DallasTemperature sensors(&oneWire);   // Pass our oneWire reference to Dallas Temperature.
LiquidCrystal LCD(12, 11, 5, 4, 3, 2);  //Create Liquid Crystal Object called LCD
int trigPin = 9; //Sensor Trip pin connected to Arduino pin 9
int echoPin = 7; //Sensor Echo pin connected to Arduino pin 7
int myCounter = 0; //declare your variable myCounter and set to 0
float pingTime;  //time for ping to travel from the sensor to the target and return
float targetDistance; //Distance to Target in Centimeters
float speedOfSound = 776.5; //Speed of sound in miles per hour
void setup() {
 Serial.begin(9600);
 pinMode(trigPin, OUTPUT);
 pinMode(echoPin, INPUT);
 LCD.begin(16, 2); //Tell Arduino to start your 16x2 LCD
 LCD.setCursor(0, 0); //Set LCD cursor to upper left corner, column 0, row 0
 LCD.print("Distance:");  //Print Message on First Row
 sensors.begin();   // Start up the library
 pinMode(8, OUTPUT);  //pin  8, 10, 13 output pins
 pinMode(10, OUTPUT);
 pinMode(13, OUTPUT);
}
void loop() {
 digitalWrite(trigPin, LOW); //Set trigger pin low
 delayMicroseconds(2000); //Let signal settle
 digitalWrite(trigPin, HIGH); //Set trigPin high
 delayMicroseconds(15); //Delay in high state
 digitalWrite(trigPin, LOW); //ping has now been sent
 delayMicroseconds(10); //Delay in high state
 pingTime = pulseIn(echoPin, HIGH);  //pingTime in microceconds
 pingTime = pingTime / 1000000; //convert pingTime to seconds by dividing by 1000000 (microseconds in a second)
 pingTime = pingTime / 3600; //convert pingtime to hours by dividing by 3600 (seconds in an hour)
 targetDistance = speedOfSound * pingTime; //This will be in miles, since we declared the speed of sound as kilometers per hour; although we're going to convert it back to centimeters
 targetDistance = targetDistance / 2; //Remember ping travels to the target and back from the target, so you must divide by 2 for actual target distance.
 targetDistance = targetDistance * 160934.4; //Convert miles to centimeters by multipling by 160934,4
 sensors.requestTemperatures(); // Send the command to get temperature readings
 LCD.setCursor(10, 0); //Set the cursor to the tenth column of the first row
 LCD.print("                "); //Print blanks to clear the row
 LCD.setCursor(10, 0);  //Set Cursor again to the tenth column of the first row
 LCD.print((int) (targetDistance + 0.5)); //Print measured distance
 LCD.print("cm ");  //Print your units
 LCD.setCursor(0, 1); //Set the cursor to the first column of the second row
 LCD.print("                "); //Print blanks to clear the row
 LCD.setCursor(0, 1);  //Set Cursor again to the first column of the second row
 if (targetDistance > 40) {
   LCD.print("LEV LOW  ");
   LCD.print(sensors.getTempCByIndex(0));
   LCD.print((char)223);
   LCD.print ("C");
 }
 else if (targetDistance < 40 && targetDistance > 20) {
   LCD.print("LEV MED  ");
   LCD.print(sensors.getTempCByIndex(0));
   LCD.print((char)223);
   LCD.print ("C");
 }
 else (targetDistance < 20); {
   LCD.print ("LEV HIGH ");
   LCD.print(sensors.getTempCByIndex(0));
   LCD.print((char)223);
   LCD.print ("C");
 }
 delay(2000);
 if (targetDistance > 40) {
   digitalWrite (13, HIGH);  //Green LED ON
 }
 else {
   digitalWrite(13, LOW);   //Green LED OFF
 }
 if (targetDistance < 40 && targetDistance > 20) {
   digitalWrite (8, HIGH);   //Yellow LED ON
 }
 else {
   digitalWrite(8, LOW);    //Yellow LED OFF
 }
 if (targetDistance < 20) {
   digitalWrite(10, HIGH);   //Red LED ON
   delay(2000);
   digitalWrite(10, LOW);   //Red LED OFF
 }
 else {
   digitalWrite(10, LOW);   //Red LED OFF
 }
}
#include <LiquidCrystal.h> // Cargar biblioteca de cristal líquido
#include <OneWire.h>
#include <DallasTemperature.h>
#define ONE_WIRE_BUS 6 // El cable de datos está conectado al pin 6 del Arduino
OneWire oneWire ( ONE_WIRE_BUS ); // Configure una instancia de oneWire para comunicarse con cualquier dispositivo OneWire
// (no solo los IC de temperatura Maxim / Dallas)
DallasTemperature sensores ( y OneWire ); // Pase nuestra referencia oneWire a la temperatura de Dallas.
LCD LiquidCrystal ( 12 , 11 , 5 , 4 , 3 , 2 ); // Crea un objeto de cristal líquido llamado LCD
int trigPin = 9 ; // Pin de disparo del sensor conectado al pin 9 de Arduino
int echoPin = 7 ; // Pin del sensor Echo conectado al pin 7 de Arduino
int myCounter = 0 ; // declara tu variable myCounter y ponla a 0
float pingTime ; // tiempo para que el ping viaje desde el sensor al objetivo y regrese
float targetDistance ; // Distancia al objetivo en centímetros
flotar speedOfSound = 776.5 ; // Velocidad del sonido en millas por hora
configuración vacía () {
Serial . comenzar ( 9600 );
pinMode ( trigPin , SALIDA );
pinMode ( echoPin , ENTRADA );
LCD . comenzar ( 16 , 2 ); // Dile a Arduino que encienda tu LCD 16x2
LCD . setCursor ( 0 , 0 ); // Coloca el cursor LCD en la esquina superior izquierda, columna 0, fila 0
LCD . print ( "Distancia:" ); // Imprimir mensaje en la primera fila
sensores . comenzar (); // Inicie la biblioteca
pinMode ( 8 , SALIDA ); // pin 8, 10, 13 pines de salida
pinMode ( 10 , SALIDA );
pinMode ( 13 , SALIDA );
}
bucle vacío () {
digitalWrite ( trigPin , LOW ); // Establecer pin de disparo bajo
delayMicroseconds ( 2000 ); // Deje que la señal se asiente
digitalWrite ( trigPin , HIGH ); // Establecer trigPin alto
delayMicroseconds ( 15 ); // Retraso en estado alto
digitalWrite ( trigPin , LOW ); // ping ahora ha sido enviado
delayMicroseconds ( 10 ); // Retraso en estado alto
pingTime = pulseIn ( echoPin , HIGH ); // pingTime en microcegundos
pingTime = pingTime / 1000000 ; // convierte pingTime en segundos dividiéndolo por 1000000 (microsegundos en un segundo)
pingTime = pingTime / 3600 ; // convierte el tiempo de ping en horas dividiéndolo por 3600 (segundos en una hora)
targetDistance = speedOfSound * pingTime ; // Esto estará en millas, ya que declaramos la velocidad del sonido como kilómetros por hora; aunque lo volveremos a convertir a centímetros
targetDistance = targetDistance / 2 ; // Recuerde que el ping viaja al objetivo y regresa desde el objetivo, por lo que debe dividir por 2 para la distancia real del objetivo.
targetDistance = targetDistance * 160934.4 ; // Convertir millas a centímetros multiplicando por 160934,4
sensores . requestTemperatures (); // Envía el comando para obtener lecturas de temperatura
LCD . setCursor ( 10 , 0 ); // Coloca el cursor en la décima columna de la primera fila
LCD . imprimir ( "" ); // Imprimir espacios en blanco para borrar la fila
LCD . setCursor ( 10 , 0 ); // Vuelva a poner el cursor en la décima columna de la primera fila
LCD . imprimir (( int ) ( targetDistance + 0.5 )); // Imprimir la distancia medida
LCD . imprimir ( "cm" ); // Imprime tus unidades
LCD . setCursor ( 0 , 1 ); // Coloca el cursor en la primera columna de la segunda fila
LCD . imprimir ( "" ); // Imprimir espacios en blanco para borrar la fila
LCD . setCursor ( 0 , 1 ); // Vuelva a poner el cursor en la primera columna de la segunda fila
if ( targetDistance > 40 ) {
LCD . imprimir ( "LEV LOW" );
LCD . imprimir ( sensores . getTempCByIndex ( 0 ));
LCD . imprimir (( char ) 223 );
LCD . imprimir ( "C" );
}
else if ( targetDistance < 40 && targetDistance > 20 ) {
LCD . imprimir ( "LEV MED" );
LCD . imprimir ( sensores . getTempCByIndex ( 0 ));
LCD . imprimir (( char ) 223 );
LCD . imprimir ( "C" );
}
else ( targetDistance < 20 ); {
LCD . imprimir ( "LEV HIGH" );
LCD . imprimir ( sensores . getTempCByIndex ( 0 ));
LCD . imprimir (( char ) 223 );
LCD . imprimir ( "C" );
}
retraso ( 2000 );
if ( targetDistance > 40 ) {
escritura digital ( 13 , ALTA ); // LED verde ENCENDIDO
}
else {
digitalWrite ( 13 , BAJO ); // LED verde APAGADO
}
if ( targetDistance < 40 && targetDistance > 20 ) {
escritura digital ( 8 , ALTA ); // LED amarillo ENCENDIDO
}
else {
digitalWrite ( 8 , BAJO ); // LED amarillo APAGADO
}
si ( targetDistance < 20 ) {
escritura digital ( 10 , ALTA ); // LED rojo ENCENDIDO
retraso ( 2000 );
digitalWrite ( 10 , BAJO ); // LED rojo APAGADO
}
else {
digitalWrite ( 10 , BAJO ); // LED rojo APAGADO
}
}-
 Arduino ATmega 2560 R3¡Oferta!
$20.50$19.00 -
 Arduino Uno Wifi¡Oferta!
$15.00$13.00 -
 Arduino Mini USB Nano V3.0 CH340 Chip Board 5V 16M + Cable¡Oferta!
$10.00$9.50